Sportster Battery Removal and Replacement
Steve Knoble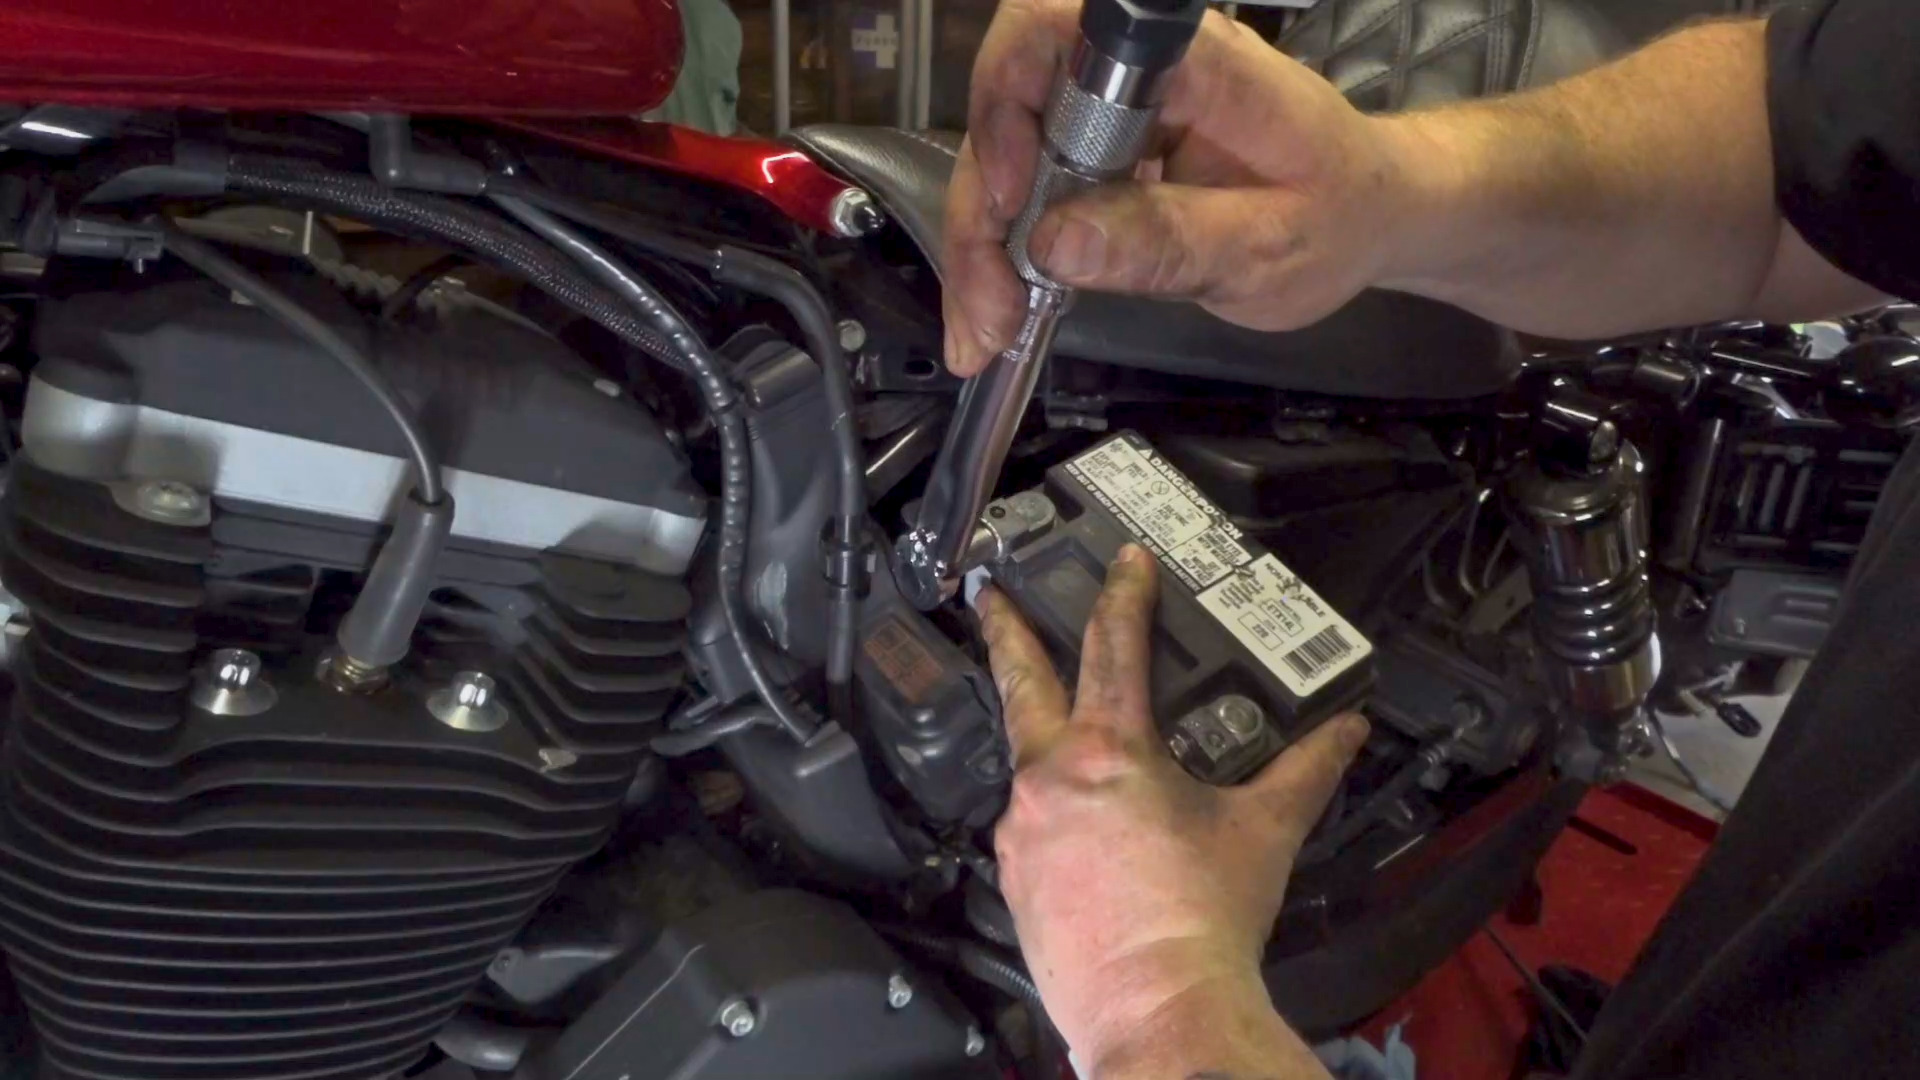
Video Player is loading.
Steve Knoble joins us with a 2012 Sportster Iron strapped to the lift and is prepared to remove the Sportster battery. Sportster battery removal and replacement is an easy task on some Harley-Davidson model years and it is a more tedious task on some others. This 2012 Iron is a good example of a slightly more tedious procedure as Steve demonstrates.
Start by removing the left side cover. Pull outward to release the cover from its two top retaining clips, then pull upwards and off of the bottom retaining tab. Next, the motorcycle’s main fuse caddy and the data link plug can be unclipped from the battery retaining strap. Use a 7/16″ socket to remove the strap retaining screw and remove the strap.
Next, is the challenging part of the service. The Sportster battery negative cable needs to be unbolted from a stud located at the top of the transmission/engine case. What makes it challenging is that this area is difficult to access. Using a shallow 7/16″, 1/4″ drive socket with a swivel adapter and an extension usually works best for accessing the nut that retains the cable end. This step can be a challenge, even after successfully completing it a number of times. So, take your time and practice patience.
Once the cable has been released from the stud, it is a good idea to wrap it with electrical tape to keep it from contacting any metal that may ground the Sportster battery. Now, move back to the left side of the motorcycle and remove the screw that retains the positive battery cable.Once the positive cable is removed, note the orientation of the negative cable and you can slide the Sportster battery and cable out of the motorcycle.
Installation simply happens in reverse, with reinstallation of the negative cable being the only challenging hurdle to get past. Make sure that the negative Sportster battery cable does not loosen when pushing the battery back into location. It is a good idea to use a small amount of blue Loctite on the battery hardware.
Posts and Videos on Sportster Battery Removal:
Harley Sportster Battery Removal & Seat Removal
Battery Replacement with YUASA
All Sportster Maintenance Videos Here
Hi, welcome to 'Fix My Hog'. My name's Steve Knoble. Got 2012 83 Iron up here on the lift today, and we're gonna cover battery removal and reinstallation. This is a procedure most people are gonna have to do at some point in owning a motorcycle. It's pretty straightforward repair that you can do with some basic hand tools.
There's just a couple of important steps you want to take to keep your battery and yourself safe as you go through this. So, let's get right to it. Okay, we're over here on the left side of the bike. This is our battery cover. Now, to remove this, it either pushes into these clips or on some years they have a little spring tab that goes around the front of this.
And you flip that up with your thumbs. And you will pop it right out like that. Now, to undo the tab on the bottom, this is the one that gets everybody stuck. Once you pop this free, just lift the side cover all the way up. And you can push on it a little bit from the bottom with your hands, and then slide it back out.
There's a little hook down here. It has a little notch on it. And that's what goes over this little ring right here, this little eyelet. So, slide it back on. It'll just hook back down in there.
Slide it in, it'll drop down. Of course, remove it, lift up, and pull back out. Put this in a safe spot where it won't get damaged or scratched up. And from there, we're gonna head over the right side of the motorcycle. Okay, we're over on the right side of the motorcycle.
The next step is to remove the negative cable from the chassis of the engine. And according to service manual, we need to do that with a small socket and a swivel and an extension. Now, where that wire actually attaches to is right down here at the end of the screwdriver. So, we will go down in there, and hopefully you'll be able to see that small screw that I'm pointing at right there. Now, I would be able to get that off of there without taking any other covers off, but I wouldn't be able to get it back on with my fat fingers.
So, even though the service manual doesn't state it, I'm gonna take this front Poly cover off right here with just these three Allen screws. And that'll give me a little more room down the road to, well, initially to get the nut out and then to hook it back up. So, let's do that. All right. First thing we're gonna do is remove this larger one.
Takes a 5/16 Allen wrench. Set that bolt off to the side. And these two front ones take a 3/16 Allen wrench. And due to low clearance, I'll have to use a conventional 3/16 Allen wrench for this bottom one. I have a ball in there, so now that I broke it free, should be able to spin it out.
And it should just pop right on up out of there. All right. Now basically what this allows me to do is be able to get my finger back in here to the screw, which will make the removal process a whole lot easier. All right, now we've got the side cover off of there. What Harley recommends on their service manual is to take a 7/16 socket on extension and then a swivel.
And they can reach down in here from the top and back that out of there. Or the other option I like to do, since we got this side cover off, and you have a little bit more clearance this way. So you take a ratcheting gear wrench, make sure it's on lefty loosey. And I slide that up on there, and I can just break that free. And gear wrench it right off out of there.
And from there, I can stick my finger in there and spin the nut right off there. Well, I'll have to take a wrench, back it out a few more turns. From there, you should be able to spin it off of there with your finger. The nut will flop off the side. Hopefully you can grab with your fingers and slide out of there.
If not, take a long magnet or a long flathead screwdriver and snatch it up there. And from there, take your pointy finger there, lift your negative battery terminal up off, or your battery cable, up off the terminal. And set that down to the side over here. You want to make sure this isn't actually touching anything. That way, the whole bike is de-energized.
If you have to, we'll even wrap a small rag around it to keep it from touching anything, hold it into place. All right, back over here on the left side of the motorcycle. And next step that we're gonna want to do is we have to take these two connectors here off the battery terminal strap. So, do that, you slide them forward and then pull it back towards you. You can see there's like a little keyhole type shape there.
Sits on that pin. And do it with the bottom one, too. Boop, boop. Just like that. All right.
Now the next step, we have to take the battery strap off, and to do that, we remove this screw right here. That takes a 7/16 socket. We'll left loosey that sucker right on out of there. Break free. I take this screw, possibly washer, set this in a safe spot, and we're gonna actually take the battery strap here, lift it out, and we will unhook it from the top.
Take that, set that off to the side. Now the next step we're gonna do is we're gonna take the rubber boot here up off the positive terminal, and push that all the way off to the side. Now we're going to take a 10-millimeter wrench, and yes, you heard me right, a 10-millimeter wrench, and we're going to remove the positive battery terminal screw. So just lefty loosey that sucker on out of there. All right.
And then your cables, and just lay off to the side there. Take your screw, keep track of it. I'm gonna thread it back into the battery terminal there. From there, I'm gonna just grab a hold of the battery and slide it right on out of there. The negative cable on the other side will follow right up through there.
And the reason we unhook it that way is we wouldn't really be able to pull it out far enough to unhook the negative battery cable with it still knotted to the transmission on the other side. Just wanna slide it right up on out there. Now at this point, you can pull the whole battery all the way out, but I recommend to undo the negative cable right now when you have a chance. So once again, take your 10-millimeter wrench. Break that free.
Break that a little more free. Take that, your mounting screw, thread that back in the terminal. Of course, when you do this, you want to be careful that you don't take your wrench and accidentally cross the terminals. That can cause an arc, damage your battery, or possibly damage you. But with this battery cable unhooked there, we can now remove the battery all the way out of the bike.
All right, now the next step we do is to re-install the battery. We're gonna take it, support it on the edge of the battery box there. Unthread our negative screw back up off of there. Take our negative battery terminal, put that in place. Make sure there's no corrosion.
Make sure all your surfaces are nice and clean. Then thread that in there. Then, for the moment, snug that up with a wrench. Again, being careful you don't cross the terminals. Now that the barrier terminal's snugged up on there, the cable's in place, we're gonna take our inch-pound torque wrench.
Make sure the battery cable's pointing off to the side there. And we have it set to 60-70 inch-pounds, the service manual states, and of course check service manual on your year. We're just going to tighten her on up there. Right there. Then from there, we can slide the battery all the way back on in there.
Now we'll probably have to go over to the right side, grab the battery terminal from the bottom and pull it down a little bit just to make sure it's pulled all the way through. Now, I went over to the right side of the bike, pulled the negative battery cable through a little bit, made sure it's hanging in a free location where the wire is not coming in contact. The metal terminal on the wire is not coming in contact anything metal. So it doesn't accidentally energize the bike prematurely. So, push the battery all the way back in there.
And then from there, we can run our battery cable back up here. Move the rubber boot out of the way. Actually our battery cable needs to be behind our fuse box right there. So slide that in place. We'll take our other battery wire here.
It runs our control circuits, and put that behind there. Slide our screw through. Thread that into the battery. All right, and everything's up in place. We can take our inch-pound torque wrench.
We're tightening this to 60-70 inch pounds, it stated in the service manual. And of course, check your service manual. We're gonna ratchet it on tight there. And tighten it up till the torque wrench clicks. Right there.
All right. Now put the rubber cap back down in place, and we'll put the battery strap on. All right. So the next step on this is to put the battery strap back on there. So of course it hooks back on the top, right from where you hooked it, took it off from.
And take your small quarter 20 screw here. Thread that back into the bottom of your mount down there. And take a 7/16 socket. And tighten that up. Tighten that one up to 80 inch-pounds, approximately, as your service manual states.
Of course, check your service manual. Then from there, we can take our electrical plugs here. Of course, the little keyhole design. Snap each one of those back into place. Just like that.
Push your little rubber grommet back down over top of your battery. And you're ready to put your battery cover back on there. Just like as we discussed before, so you have this little hook down here. We're gonna slide this in across, and then drop down on there. Cross drops down on, and push that into place up here at the top.
Snap it in there. Make sure both the top, both of the top ones are snapped into place. Otherwise it will come free on you when you're riding and start flapping in the breeze. Now, go back over to the left side of the bike, or sorry, go back over to the right side of the bike and we'll hook up the negative battery cable. All right, we're back over here on the right side of the motorcycle.
So now all we have do is put the negative battery cable here, back onto the stud. We should be able to slide it right back up on there. Hopefully the memory of the wire will drop it right down into place for you. Now comes the challenging part, being the nut, back onto the stud. Hopefully you'll be able to get your fingertips in there.
Slide it back into place. All right, now we're gonna reach back down in there with our ratchet, our inch-pound torque wrench. We're gonna tighten that up. Tighten this up to 70-80 inch pounds, it stated in the service manual. Of course, check your service manual.
And... right there we go. All right. And of course, so, battery's all buttoned back up. Last step, just put the sprocket cover back on.
Gonna slide all our bolts in place there, and slide the cover back into place. We'll just get these started in place there. All right. So, service manual says tighten these up to 80 to 120 inch-pounds. We're gonna take our 5/16 socket Allen socket back here.
There's that one. We're gonna switch to our 3/16 Allen socket. There's that one. And now this bottom one down here, I'll just get with a standard Allen wrench and just tighten it up to that same feel as you did the one up here, because we can't get a socket down in there on the screw. All right, there you have it, battery's back in.
Everything's hooked up. We're ready to go ride. As you see, it's a pretty straightforward repair. Most people can do this with the basic hand tools in their garage. That's all I really have for you today.
This is 'Fix My Hog'. My name's Steve Knoble. Thank you for watching.
This is not accurate for my 99 sportster