FMH LIVE: Benchtop Demo’s
Tommy Creal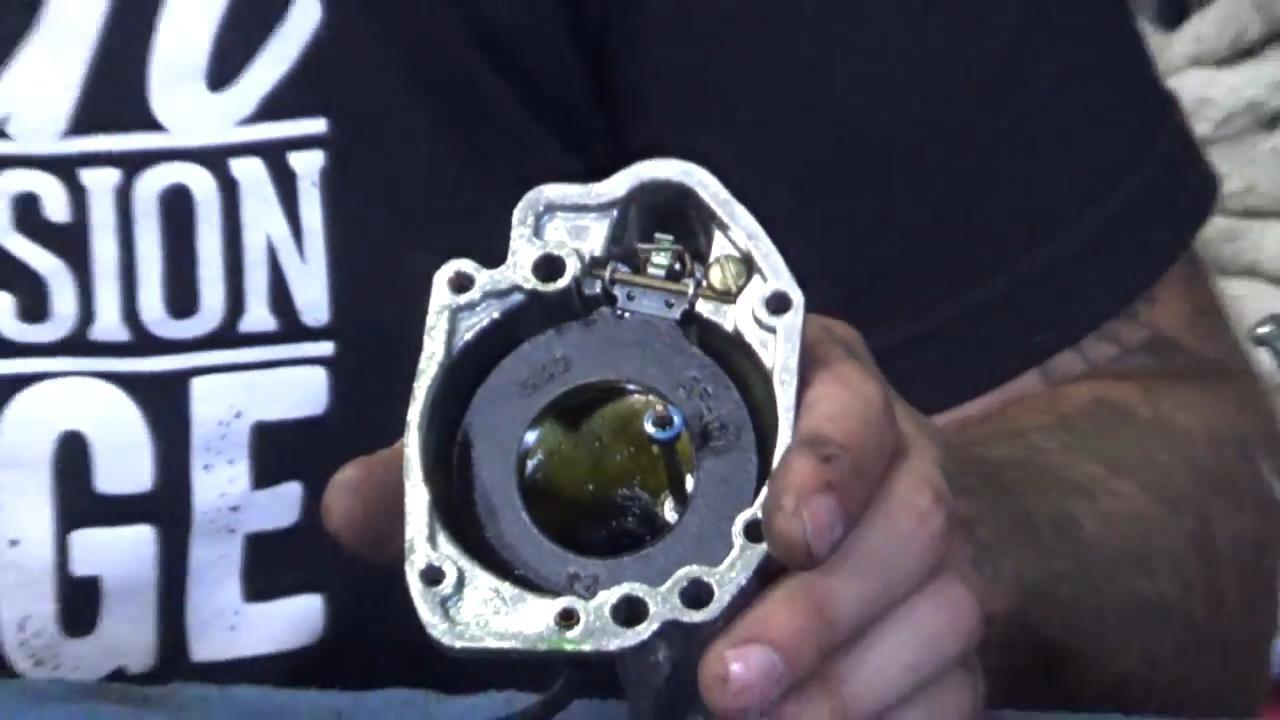
Video Player is loading.
Thank you Tommy ‘Clutch’ Creal for presenting some benchtop demo’s and disassembles. He got through several topics; braking system, starter rebuild/components, EFI/carburetors, ignition coils. Make sure to click on the links here after you watch Tommy for in-depth step by step videos and articles.
Make sure to share your Hog with us on Instagram #ShareFMH
Related FMH video:
Harley Fuel Pump and Filter Removal
Softail / Dyan Fuel Pump
Throttle Body Video
XL Injectors connected to Cobra PowrPro
In The Shop Article on Injectors
Love the Carb Projects on FMH
Air Intake Upgrades and more
Carb Upgrade Products
Starter Push Pull Test
Harley Starter Clutch Replacement
Article and Info on Starter Ring Gear
Harley 4 Piston Caliper Rebuild

Hey guys, as many of you know, I'm Tommy Creal. I'm here with Fix My Hog for this month's live event. And as maybe you can see, there's quite a bit of parts, so we're gonna be going through a lot today. But wanna mention a few things before we get going on this event here, make sure you're dropping some questions in throughout this entire show in that chat box you see right there, you know, I'm gonna take some peaks over and see if you guys have questions and do my best to give you some thorough answers with those. So if anything pops up during the next hour or so, as we cruise on through this, these parts here, make sure you just drop it in there or let us know.
Also, right below that chat box, there's a, another free thing, a downloadable trouble codes with Harleys so make sure you check that out. We have some birds that are right outside our garage door Download that and then also on Instagram, make sure you hit that hashtag share, Fix My, FMH and post your hog up there and what you're cruising around on. So there's a lot to do over here. And with that being said, I'm going to get underway here for you guys, so. Today, what we're gonna be rolling through is as some of you may know, we're gonna be going through an EFI system, what makes up that EFI system, some of the troubleshooting that you guys may be having on your bikes, we're also gonna be diving into the carburetor, disassembling that I'm a be going through the parts on there, how to clean it and maybe touching on a few of the upgrades that you can do if you've got a Shorty or McCooney CV carb, air cleaners, that kind of stuff, we're gonna touch on.
Additionally, getting into starters, which is a big thing. We see a lot of issues with that key component to our bike and getting that thing working properly is gonna give you a long time longevity on your bike. So I'll be touching on starters. And then also what you see right here is partial make-up of a braking system, so we have a caliber here. Just a front perch master cylinder, and then an ABS unit right here for our front end and then align.
Hopefully we get to ignition coils and all that stuff. Try my best to fly right through with you guys. But yeah, give me enough information, so. All right. Are you ready behind the camera back there?
We're gonna test our camera skills with the zoom today. All right guys, so a lot of the bikes that we have nowadays we've got EFI systems put in there, electronic fuel injection, and with that, obviously, comes a little bit more complicated parts and electrical components than just having a standard CV, constant velocity carburetor, or, you know, an S and S shorty setup, so it's critical that we check all these parts that I'm gonna go through and mention at the same time, it's gonna give you a better maintenance and less issues and keeping a few bucks in your pocket as well, so. The big makeup of our EFI system. So obviously having a fuel tank, but under there, located right under that, on this Sportster, you're gonna see this insert area right there and that's for our fuel pump. Are we doing one for one with the zoom?
Look at you. And with that, here's the luxurious fuel pump that we have. Right here is our gasket, which every time you take this out, I highly recommend changing this, I know a lot of people have heard things in the past where you can get a couple uses out of it, you can with any kind of gasket or washer that's preventing or sealing and keeping anything from leaking, I always recommend changing that out so you don't have any cost or erring on a side of caution with that. All right, so, in our pump right here, obviously, this is a submersible fuel pump right on top right here is our actual own relay. We have our pump right here and then all the lovely electrical items in here.
So if you ever pull this out and swapping tanks, for instance, on this Sportster, we had to pull this out anyways 'cause we're gonna be swapping tanks, when we re-install this, what we're gonna do is, obviously, number one, check for making sure it's clean, there's no issues with the operations of our fuel system entirely. And if it wasn't clean, we'd be going through with only gas to clean this up. So, reason being is you don't wanna apply any other lubricants or cleaning agents to this that has a potential of being another additive in your gas after potentially not cleaning it off. So, always clean your items with what kind of lube is gonna be surrounding them. For instance, obviously with oil pumps and filters and stuff, use that same oil.
So, same thing with our fuel pump. And these typically don't have too many issues with them. If you're running into issues where they're not working properly, check the sensors. If there's potentially a mechanic or electrical air, I'm making sure that these pins in your connector are all the way pushed through, you know, if you have plenty of miles on your bike and you're ripping around the country, electrical items always seem to be number one priority in my case, that becomes a problem. So, these have the tendency to back out, these pins and even the wires come loose.
So, and if also they're not properly installed you may pinch or bind those wires, so, take a close eye on that when you got it off and it'll be easier on your head putting it through. Those are birds man. Joining us for the show today. Also the gasket, make sure you're inspecting the gasket as well. Make sure there's no tears or leaks if you're gonna be reusing it.
If you see any small tears or more like dry rotting, that you'd see on a tire where it's peeling away, make sure you change that immediately. It's only gonna lead to a lot more issues as you continue to ride and go through some whips and turns and stuff. And here's one of the big agents, obviously, are fuel injectors. These are the Holy grail to it all, makes up another part of our entire fuel system here. How you doing with that zoom?
Fine. Can you get in and see the little spray holes in there? Yeah. So, fuel injectors, a few things that I'm gonna say before we jump into what this is comprised of is some of the items troubleshooting on your bike, if you're having bogging, you're not able to even start your bike or there's hesitation when you're mid range, full range, low range, whatever it may be, obviously, you wanna check your fuel injectors and your electrical side of it too. Reason being is that these have a tendency to build up deposits on this screen right here.
Now, this is gonna be awfully hard to see and you're not gonna even be able to see it, but four holes, which spray out our gas. So they're dispersing the gas into our cylinder, all areas covering ground and those have a tendency to back up and clog, so, obviously it's gonna be a big time issue when you run into a performance side of your bike. So, easiest way to clean this, is you're just gonna flush it out with gas. Don't use any kind of steel going into this, brushes, things like that. I know there's plenty of people that have probably tried that and all it's gonna do is potentially just enlarge these holes and scratch up and divot this, so, make sure you clean it with gas, make sure your O-ring on top right here is still in good condition that can actually cause a leak on the top side of this and then also the electrical side.
So, surprisingly, I continue to see electrical on all of these shows that we do just because that is probably the biggest culprit, I think people overlook time to time and definitely me is that you just never know with that. So, on these you have two pins for their connector, when you're putting it in make sure that is a solid connection and those pins are on top, are in good shape. And if you're changing one of these out, if you have scratches or dings and that'd probably be a good time to change this out and order a new one, under a hundred dollars for a new injector, so, it's not, won't take you to the grave on that one. On top of that, obviously, these are going into our manifold going into the cylinders. This is the connection piece on the top.
Now, this is why it's so important to have that O-ring, that is a tight, tight fit. Good? Mm-hmm. Look at you. A tight, tight fit when you install this back into your bike and then you put your connection piece on here and make sure you double, triple check this piece.
There's been a few bikes that we've seen come in that have this issue where it's leaking. And obviously that's gonna be a headache down the road. So fuel injectors, make sure they're not clogged, make sure you clean them correctly, at the end of the day, if you do need to pop one out, go ahead and feel free to order a new one if you see those dings and all that kind of stuff. So, additionally, with our fuel injections, our fuel system we have the pump, we have obviously our supply, which is our fuel tank, we have the injectors. And also with that, we're gonna have a source to tell this, tell our injectors and the electrical side to it when to disperse the gas and to monitor that, so we have a lot of senses that are comprised in the fuel system alone.
We have, you know, engine sensors, we have temperature sensors, and then we have our air intake sensor as well on top of the manifold, the throttle body. And all those are telling something to work. So that is our power commander or fuel pack, whatever you may have that is sending that signal to push that gas through the entire system, draw it and push it through. And there are various options out there, I won't go through all of them. I'm checking for questions, but, make sure you get something adequate and appropriate for your application.
So, if you're doing a stage one kit upgrade on your bike or even more so important, if you're doing a upgrade to your intake, then you're gonna wanna look at probably getting a higher end and configuring that power commander or fuel pack to operate a little bit better, it'd give better performance, better fuel consumption and mileage on the bike and run into a lot of good pros with that. So when choosing that go through the specs or even call the dealer, call Harley see what they recommend for your application. But that is a critical part for this entire system. So, all in all with fuel injection systems, there's a lot of electrical so a lot can go wrong with it as well. Sensors are always my favorite.
You know, you can really, really get a migraine with those. So make sure you're checking your sensors and then all these fun little things that we just went through here with your fuel pump, gaskets and injectors as well. Sorry, coughing up a lung. So if you're going, eh, let me make sure. Let me check for questions with you guys real quick.
So if you're going down a route where you want better fuel consumption, a lot of the bikes, obviously, newer age are comprised of injectors rather than going versus to the carburetted system. So if you're looking for something that is relatively more reliable and less likely to run into issues then this would be something that you'd probably wanna look at and convert your bike to, if you don't already have it. If you're not looking to get a headache with the electrical side and get all this bulkiness on to your engine, so to speak, then carburetted system would probably be a better approach which we're gonna go through here in a few minutes. So that's pros and cons like with anything on there is that you're gonna give a little bit to take a little and it's all based on what you're trying to get out of your bike, so. We have EFI systems and just in general, that's pretty much all it's made up of.
So it's not too hard, excuse me, but just a lot to check and test if you're having issues with it. You guys can hear me gulp on here. All right, now we're gonna jump into our carburetors, which, personally, these are my favorite. I'm a guy that likes to go after the mechanical side of things, so, I've always urged people to go on a carburetor system. So, we have different kind of vendors out there for carburetors, so, S and S, obviously, being one that most of you guys and girls have heard of on this side McCooney, they make a good constant velocity carburetor, where, what that does, is it already adapts to your altitude, the temperature, all that right inside in that throttle body, it makes all those adjustments, so you wouldn't have to do it with this S and S that we're gonna go through.
So bear with me, this is the good stuff, this is gonna save you a couple of bucks in the long run, if you do have a carburetted system, we're gonna take this thing apart. My birds, those birds are about to get a fuel injector up there. All right, so, make sure you guys are dropping your questions in on this one. This is a, this is a good one. All right, so, like I said, I'm gonna get this, excess hose for the most part This a shorty.
I believe shorty G, S and S carb right here we have our two bolts that connect to our manifold going into our cylinders. And we have our gasket as well. Now notice, stay zoomed in in, my man. Notice the O-ring on the inside of the carburetor here. And then on our gasket right here we have an O-ring on this side and not one on this side.
When you do reassemble this and install back on your bike make sure that O-ring on this side is going directly to the manifold and this O-ring is on the flat side right here. That's gonna help seal that a lot better than putting an O-ring on O-ring causing a large gap for air to get in and then throw off all your mixtures and everything here. So even small stuff like that, pay close attention to. This one, in terms of replacing gaskets too and I'll show you some inside here, this one is relatively, this cork one is, is relatively good. I think we've had this, we've had this customer's bike for eight years and we've replaced this just a few times doing more engine work so, make sure, you can take a look at it, but if it's not cracked up and still sealing correctly, you can not worry about replacing that one.
On the outside here, obviously, we have our area for our lines, our housings right here, going into our throttle body, right here we have our air mixture screw, here's our choke. Our accelerator pump is right down here. Drain bolt. Fuel supply. And then our float bowl will be down here.
Now that's the good stuff along with the jets. All right, so what we're gonna do in anything that we're taken apart on an engine carburetor, even primary, for that matter, I always recommend taking those bolts out and putting directly right back into that, the threads that you pulled it out of, reason being, is that bolts and metal and just different type of alloys have the ability to meet and it's gonna make that seal a lot better. And especially on engines when you're taking off your heads, your jugs, your rockers, make sure those bolts are going back into that exact same spot. So, and you're always loosening up from the inside out and tightening it in a star pattern. So with this, I'm gonna start from the bottom up, from the accelerator pump, we're gonna crack all these loose first.
Now reason being is we crack them all loose first is that we don't wanna apply any additional stress on one bolt or the other, that could cause them to fracture and split. I know it sounds silly to a lot on people out there but I've seen it happen more, more and more and that's a costly repair as well. All right, so I'm gonna loosen these guys up. My fat fingers can't get in now see. All right, we are gonna have a diaphragm, we're gonna have a spring.
So what I'm gonna do is, I always do with our projects is we're gonna lay these bolts and parts out as we take them out, giving them a reference points to putting them, reference point to putting them back in. And it makes your life a lot easier. All right, come on. All right. Now I'm gonna put these guys right back in.
I'm just gonna take a quick glance and see how we're looking with our O-rings and gaskets currently in here. Once I get this guy back in. Come on. We're working good today. Come on.
Go home. Get in there. Now when you're obviously fastening bolts in, try your best to start them by hand going in, that way you feel if anything's cross threading, I really don't like starting with a tool or some kind of hand tool to put it in because it sometimes can't feel that pressure. So, try your best to put those in by hand. So, I'm just gonna take a quick look at the bottom here.
You want me to zoom in on it? Please do. So we don't have any big time issues with our diaphragm spring. We have a ton of gunk and it more looks like the gas was crystallizing in it on here, can you see that? Mm.
So we're gonna have to obviously clean this out. I'll get to that. Now, we're gonna crack that drain bolt, get that thing loose. What are we working with here? This should be...
Man, get some leverage on this. Holy cow! Who put this thing in here? So, what I'm trying to do is I'm trying to crack this loose and get them off by hand. Not...
He just doesn't wanna come loose. So there are limits to pulling these bolts off. I could probably crack down on this and get it hard out of there, but I rather not to prevent anything from breaking, so. Keep that away. And, additionally, what I just pulled out, can you zoom in on this bud?
We have two springs, the other one's still in there, and two little, they look like ball-bearings. Those go on the bottom of our pump right here. All right, now we're gonna crack out this float bowl. Crack all these loose. These guys need to get back to using Philips or Allens for these flatheads.
Screws have the tendency to start stripping out over time. So, I try staying away from them. All right, pull these out. So what we're gonna look forward to and as we go through this, we're gonna look for any gaskets that are potentially ripped up. He was having issues with response in here which is gonna be the needles and the jets and getting that correctly done.
And then also fuel supply was another issue he was running into where it was clogged. So, with that, there's a different, a few different types of issues that we can run into. Pull this gasket off. Sometimes when these gaskets are getting stubborn what we can do is put a small razor blade under the bottom, stay away from Phillip or flatheads it'll put a score on the metal and potentially leak, get in under there and then rip it right up. So, here's the bottom of our carburetor looking actually, really good condition right there.
This is for our accelerator pump And this is our supply going in. So, get these guys right back in there. And the other side of the carburetors, rather than having an EFI system these have more tendency to get issues with debris getting in there, depending on the air intake that you're using, if you're using an open one or like a velocity stack type, then you're gonna have, run more risk of having debris from the road, sand if you're down South, Arizona you have all that debris that can run up. So that's kind of the downside to having that. All right.
Oh, I could see. So, in our float bowl right here, is our pin. Right under here is our Tang, and what that Tang is that it determines the level of fuel that is allowed in there. Once that's capped out the fuel is then kept out and not allowed in anymore. So a lot of times when you're having fuel issues, that Tang is off, off center.
It's, you know, all we do is bend it with needle nose to get it back into place and I'll show you guys how to do that, but that's the first thing to look at too, when you're in here, is along with corrosion, if we're having corroded areas along the pin, then that's gonna determine that our range of motion with that float is not good. So, this, there's two different styles of floats too, you may have two floats on either side here or this O-ring looking one, this is the one you most likely see but we're gonna jump into pulling this off because that drain bolt I can see right now, is not good. And again, these could be a pistol. So, if you're having issues pulling these fasteners out as well, don't force them out. A lot of times, just get a correct tool in hand.
All right, zoom action ready? Now, here's our float. Here's our pin and valve in the back to determine the amount of fuel. Now, looking through here, you look all the way down. You see that black debris and then a greenish or yellowish, whatever color that may be.
That's gas actually crystallizing down there. So, when this was stored over winter one of the past couple of years, this was an area that wasn't winterized. So it had that gas sitting all the way through and that's what it's gonna look like. So, this bottom bolt is gonna be quite a bear to pull out and we'll obviously be replacing that and cleaning all this out. Can't clean it out, we're gonna get a new one, but, if you ever see something like this in your own carburetor make sure you spend that extra time cleaning it out.
And winterizing it too. That's very key because that's gonna get in your jets. It's gonna get in your needles and then clog up a lot of passages inside this, your carburetor as well. All right, now, we got inside here. Now that we have the bulk of it off of there I'm gonna look at the slides butterfly right here.
Our main jet is going right through here. So we're gonna pull this off and look at that and then take a look at our choke as well. There we go. Again, just cracking it loose, pulling it out. Now, we're gonna clean this anyways and it won't hurt to clean it, but, initially what I'm looking for is, since we have all that crystallized fuel in the bottom of the float, there's bound to be some up here which I actually do see it on the threading, so, we're gonna clean this and probably end up just getting a new one, but on your carburetor, make sure you are checking your jets because that is gonna be critical for the fuel flow to get through there and into your venturi, what is this inside area, this is where the air and fuel meet and then escape into your manifold and then go into your cylinders for combustion and going through your entire cycle.
So this is critical for having the right measurements as well. And if you are in a higher altitude state, Denver being one especially this is a part that you're gonna wanna upgrade from a stock set up on your bike being that you're gonna want a little bit more fuel and you're gonna be gathering a little bit less air, so, make sure you take a look at this if you're having issues and in those riding times. Right here is our mixture screw? It took me a minute to remember that well. So all we're doing with this one is that we're going in and out, this is gonna determine how much air we are putting in there and we need to level that out with our fuel to get correct combination with those two.
So we're not leaning out on the fuel or having too much and riching that out, so. Those are the mechanicals, the big parts of a carburetted systems, again, as you've seen in here the biggest one with this one is the sticking to the float and having that crystallized gas. So, critical that you go through check your O-rings if you have it off this far, just pop in new O-rings. It's not, won't cost you a fortune, but it'll it'll save a few headaches from you as well. All right, I'm a just see if you guys have any questions before we put this back together.
Man, I've had a frog in my throat all day today. And, additionally, let's, I guess we should jump into and talk about filters for these guys too. So, also, just a side note on maintenance with these, it's good to, even if you're not having issues of running in anything to go through at least annually and make sure everything's working properly with the carburetor. I know, yeah, you can just hit your slide and test this for the springs, but going through internally just to make sure all your passages, your floats and needles, jets, pumps, chokes, all that stuff is working appropriately. And some time to time, those O-rings don't last as long as we'd like, so check those out as well.
Other side to this is obviously we need some kind of intake preventing just the straight air coming through that's not filtered and there's various options out there, if, we'd be here for days if I went into the different kinds out there, but this one we have the stock set up with this S and S. Our backing plate was right here, which this is the bare bones of it. So backing plate right here, or choke lever when you're reassembling this and putting it back on the bike, do make sure that when you're putting this choke lever on, on your carburetors, a lot of these styles are the same, slides right in there, and that that these two bolts on the inside are bottom down all the way. We'll see, let's see a few bolt, bikes- Cool, with these things bound down. Then also make sure and examine your gasket on the inside, this one's been on there for quite some time.
So, we're gonna pop this thing off and replace it, but as you can see from right on here, there's a crack and missing piece of it already. So I'm gonna go- All right. A couple of areas on this one, these are the breather. Man! Spitting stuff at you guys today.
These are our breather and what we're gonna do on these, this helps the top of the engine obviously breathe and go through. Kuryakyn, we did a project as some of you may have seen with an M, the made, we did a Kuryakyn hyper-charger setup where it was electrical that had an inside flap that would allow and dictate how much air were to come in based on the power commander and the entire ECM unit. So a lot of brain power between those pieces but it was cool looking little set up on there, or otherwise you can go to more of a mechanical one. So with these breathers, make sure these are done correctly. You have the correct fittings you're installing in there and bolts as well.
So there is air escaping and breathing through the Ooh. And, additionally, you can go through and just get the velocity stack, I've done those before. There's all only an inside screen in there preventing some of the larger debris that you'd see, or even insects that are getting in there. That one, if you are putting on something to that extent with your carburetor unit, then you're gonna wanna definitely check your carburetor more frequently than someone that would have a full fledge air filter put in with the intake, so, there's give and take to it all, if you're gonna have to look, go on that route. You're gonna have to pay some attention to your carburetor as well and make sure you're checking up on that quite frequently as well.
And then there's 90 degree bends with the spikes and those are pretty cool. But yeah, if you've got any questions on these carburetors, different types, whatever that may be, drop it in this chat box right here, guys and do my best to get it, get it over to you. Good answer. All right. Since we've got roughly an hour or half an hour left I'm not gonna put this together.
I wanna jump into starters and hopefully get to the braking systems with you guys, so, I will stay in touch on this with reassembling this I strongly, strongly suggest you don't take our German type of reassembling and having a good and tight, refer to your manuals and, and check those taut specs. If bolts there, there's a lot to torquing and over tightening bolts or, you know, obviously if you're not torquing them enough, it'll back out. But, especially with the engine components and carburetors there are specific things with metal that will allow for expansion and contraction, and with this, if you over-tighten a lot of these things, your mixtures or your adjustments that you're making to get this on a fine tune, carburetor are gonna be out of whack and also you're looking into issues that you may have down the road, where cases being, you know cracked or something like that due to over tightening, so, that long spiel refer to those owner manuals and reference manuals so you can get the right torque specs on this, go through obviously, start all these with hand, making sure that you're only cleaning with the agent that you're using, so gasoline in this one, use a higher octane. That'll take that the additives off and what we typically do with all our jets, our needles, anything that's submersed in the gas, we'll leave it in gas overnight, clean gas, of course, and then flush it out again in the morning. So we'll use a light dose of air, blast it out and then reassemble.
So exactly where you took everything out, put it right back in and you'll be good to go. All right, that long wind of air. I'm gonna put these guys over here and we're gonna jump into starters, everyone's favorite thing. This is why I like kick-starts. You don't have to worry about the electronics.
All right. Make sure to get all these small little guys, diaphragms, spring. And for you guys that are working on some of the older bikes you're going into Bendix's linkage of the carburetors. That's a whole different ball game, but, some of them you're gonna have a larger diaphragm on the top. And you're gonna wanna check that to make sure it's not fractured or cracked a lot of times when we're putting it on top for our slide to go through, these areas are pinched and not fully seated, so, make sure you're checking that out as well.
Sweet, all right. I ain't get it yet. It'll come. All right. Wait for that question to come through but, in the meantime we're going jump on starters here.
We're gonna touch a little bit on the right starter to use for your bike. What kind of starters there are, when to buy a new starter and rebuild, so, with that being said, there are, so you're you're gonna see with starters the size difference in them, what that size difference is, it's the power that it's gonna provide torque-wise to turn that motor over. If you high have a higher displacement engine, 143 and that's extreme but you're going even to a 113 or something, then you're gonna wanna put a larger starter. And even if you have compression releases built into those heads as well- the starter. Okay.
Just from the questions. Oh. You just have to refresh the page. I'm not that slow. Oh, I'm just saying.
I'm just reading since rolled down to, so I don't know what it's gonna do. Funny guy. Okay, I gotcha. Yeah, all right. I guess we did need to refresh it, thanks, Dennis.
All right, we got a question just regarding your 88 electric glider keeps on backfiring, any tips? First thing I would look at with that is your ignition system. Typically, a lot of times with backfiring if you've played around that or upgraded your advanced, or your ignition system look at the advanced and retarding that as well. There's, I mean, if you're going into Crane Cams or a cell, there's different ways to do that, so refer to that manual, and you can even go on their website and check it out as well. But that's always the first area that we go through in seeing backfiring.
A lot of times, if you're, if you're working with carburetors, you got to look through and ensure that you're not your needles and jets, aren't clogged up. And I go through and look at the, the slides as well, I'm making sure that's working properly and your choke as well, sometimes those do stick a little bit and then you can't see it with your lever or your knob that you have there. So check that out and see if that's pushing it off. How to determine the right size needle and jets to use in stock 05 XL. See, you got a classic sporty in 02 FLH and where to learn about calculations.
So, if you're using stock, I mean, if you're using stock setup right now, I would not change the stock set up currently with any of the jets or needles. Typically we're doing that in the case that we're upgrading the engine or we're upgrading the air cleaner at the same time. So we wanna make sure that we're using or where everything's in uniform working appropriately on allowing for that. So, if you are gonna make an adjustment, do some kind of upgrade for performance on your engine, then I would suggest going through and doing a upgrade with the needles and jets and accommodating for some of that airflow. Where you can learn about those, it varies on the vendors.
There's a lot of guys that we use, we stick to the manufacturers, they have tech specs on that, as well, to help you reference if you're boring out your motor for instance, and, or you have a different stroke, you have a different, you're doing upgrades to your cams, whatever it may be, then you, they have that reference. So for this one, S and S, go to S and S, they have a pretty good reference, and then also Harley does as well where it can give you some tips on that too. So, but don't, I shouldn't say don't, but don't stay away from upgrading maybe right now, if you had that stock it's, you know, it's pretty good where it is on those 05s. 02 pops and decel, definitely, you have something. Okay, sorry.
You got an 02 pops in deceleration, definitely got something clogged on that one. That's typically a needle or jet right off the bat on there, so I'd check that, pull the plugs too, and if you're having issues with the needles and jets, pull the plugs and make sure those things are clean and gaffed correctly as well. There's videos on Fix My Hog, send to him on over there. Fix My Hog videos, check those out, that'll give you some reference point too on what else to look at, but I've seen that time and time, and one of my barbers have issues with that with my carburetor too. All right, and then Go-to parts cleaner for carbs especially when trying to remove all gasket residue?
Surprisingly removing old gaskets, we'll let it sit in gas for a little time to give it some flexibility, but I think we got some up here in the back. You can obviously go to local hardware store and get some kind of carbon choke cleaner. We use Gumout, but we've got a special company. Where is it? Maybe we ran out of it.
Oh, just any carbs spray, you know, if you're going to O'Riley's or Auto Zone or something like that, you know, you can use a gum out like this one. We spray that in, let it soak too, as well but, this will get it right off easily, take a razor blade with it and carve right under there. Don't use flatheads, I've seen a guy in a shop do that before, and that's definitely not the route you wanna go, so I guess, to answer your question more direct is that you can use anything from the store, it's not too harmful. Our preference is always Gumout but we have a special company that we use, so unfortunately I forgotten them off hand. Works fantastic, but you're good with that.
And the gaskets O-rings you can obviously put those in there as well. So hopefully that helps. Gaskets shouldn't be that hard to get off as well with sealants, it should be popping right off for you. Man. it's gonna bother me now.
Don't have that. All right, let me check any more questions. Otherwise, we're gonna jump into the- Make sure you refresh this time. Starters for, you guys are funny. Clearly you two are having a good time with that.
Dennis says he's here for you. My world right there. All right, thanks guys for going through that with me I know this is a lot of information I'm tossing your way, but at the same time, these are the small little details that are gonna give you a good start on your bike if you're obviously doing this in your garage and stuff, these are the small areas to look for and maintenance-wise so with out any, I shouldn't say with anything that we've discussed already, it's critical to generally keep up good maintenance. Even if it's a visual look over time, or if you're going through different kind of terrain or altitudes or, you know, weather changes, things like that. Just to take a visual, look at the very minimum and make sure things look like that they're in their place.
There's no major scars. One of my barbers have rode to Sturgiss for a show, we rode the, you know, a couple hundred miles to get up there and I had hit a few things, so my carburetor was getting hacked up. So, check that out. It's better than nothing too. All right, so, and Dennis just put right there in the chat box here, guys, an upgrade for carbs and products too, so there's that video for reference.
So, starters everyone's favorite thing and the worst thing to go wrong as well. With the size, where we left off on that. If you're not using compression releases in your heads which those are allowing less compression during the initial start and they pop out there's either manual or electric. Then you're gonna wanna use a much larger starter, that's gonna generate a lot more torque. So a 1.4 kilowatt starter's not gonna be good for anything over a hundred displacement in there or you'd be meeting the bare minimum.
You know, there they go, 1.8, you can go up to 2.0, 2.4 on some of our larger applications in the past and bikes that we've built from the ground up. And one out of picture right here that you guys can't see, that's a 124. So we've got a 2.4 on that one. Obviously it's gonna be a little bit bulkier on this side cause you have your solenoid and then your armature inside and Bendix but it is gonna give you a better longevity and better results when starting your bike up as well. So size of your starter that's that, that's kind of the basics to it.
So if you're having issues with starting up and it doesn't feel like you're draining your battery with it and you're not able to kick it over the first time, you know, do that, upgrade that and you should have some better results with it. And then starting issues that we see all the time is our starter Bendix. Which, how this looks like, is this, when we hit that starter button, this jumps out, we have a Bendix with the gear right here on the outside edge, that goes to our inner primary or outer primary, but into a support. And it goes into that bushing and spins a ring gear which is in the outside of our clutch hub, spins our clutch hub, spins our pulley for the motor activates everything with the cam and the advanced or with our ignition system and then you should be off and running. Now, a lot of times you hear grinding, you hear like something's jammed and you don't see your, if you have an open primary, you don't see it moving or you don't hear your inner primary moving at all, a lot of times this Bendix will come out and not fully insert itself into that outside housing right there, if you're putting, you're taking this off make sure indefinitely with your primary for any other application, make sure you take a look at that copper bush in there should be reamed out for oil retention to allow some oil in there and not push it directly out, but also a lot of times that won't fully engage and push in there.
So that is the biggest culprit that we have seen over the 15 years of doing this and also stripped out teeth on this as well. So, you can get different size or different amount of teeth on the starter Bendix, but, necessarily don't need to, but there's that option as well. So, in a nutshell, if you're having issues with starting, it's jamming, check the starter Bendix, check the teeth, check to make sure that it's fully engaging with that ring gear, and then if that's not the issue, then you gotta look at that ring gear on your clutch hub. So that's a whole 'nother issue. Also a lot of things that we see go wrong with this are the solenoids popping out and just defaulting on us and also having our armature go, which is wrapped in electrical wire and have communicators on top.
And those sometimes the resistance and homes on those get shot and out the windows. So, there's two different options if you're having starter issues and it's internal before I tear this apart, I'm gonna cover that. You either can rebuild it or buy it. And the easiest way that I differentiate the two is that outside of cost and money and time that you're putting into it is how much that you're gonna be going through and replacing on this. So, for instance, if we were to pull this one off we actually pulled this one off says mock up now for our bikes.
If, when we pulled this one off, we put a larger one in and this one wasn't running properly. So we had an issue with the armature and the solenoid. So immediately we just got a new one. Now, if you're working with one component I strongly suggest just doing a rebuild for a hundred bucks rather than spend a couple hundred on a new starter, and definitely if you're going up to a larger kilowatt starter, it's gonna be a lot more. So take a look at that.
But, the amount of work that we had to put in this one, immediately said, no. No way. All right, also on these, on the outside the solenoid right here, you see nice little housing. So as a backup with starters, what we've typically done in the past on customer's bikes that had frequently run into the issue, pop this cover off and we get a push start. Now, that's as simple as having a case like this.
So long now, a spring or diaphragm, all you do is you push that directly out and engages your starter. Bendix rotates, and then usually fires your bike up. Now that's a backup to having electrical issues with the starter itself. So, always suggest having a backup or some kind of, excuse me, option there for that as well. So disassembly, how to get into these and check to see what we're working with.
This terminal is our power source terminal, by the way. And this goes directly to our battery. So we're gonna be running a long cable from here up to our battery. All right, so we're gonna get into this thing And, I'm just taking a peak to look at how dirty this is, pretty gunked up, checking where our dowels go that as well. So, what we're gonna do is I'm gonna pop this off, then we're gonna take off the cable.
Oh boy. I don't like the feeling of that one. All right, there's two Phillips inside of here and they are torqued down pretty well. And I feel it stripping before I even turn it. So I'm gonna skip right around that now so we can at least get you inside this thing.
We can go through some of the components before checking on the brakes too. All right. So, pull out the armature, let me see pull up and just direct it back on. All right. Oh you birds.
That we using. All right, we got two studs running through. I'm gonna pull off these right here, this was for a cover there's aftermarket stuff up the kazoo on these things you can run into getting Chrome covers for this entire thing, Kuryakyn does quite a bit of that stuff and you can doll it up that way too. So if you're trying to save a couple bucks on a new starter and not have it chromed or polished and just wanna get a flat black or matte, you're gonna save a couple bucks on that as well. All right, just like we did at the carburetor we're gonna loosen these two in increments Pull out our studs.
It's almost like someone painted this thing. Sheesh! Someone did paint it. All right, right inside, you can see here, so, got our armature. See our teeth right here, engaging in the gear right there, You zoom in on that beau?
There's still NICs over there, so that's good. Bearing seems to be proper. A lot of time with electrical components, you're gonna see these things, armatures going. Now, when you're pulling these out, I strongly suggest try not putting your fingerprints on any of these things, these communicators strips right here are highly sensitive and same thing in the windings of your wires as well. So, you can see the little slicing in these two.
And that's for weight distribution as well. But, testing these is a pain, you individually have to go strip by strip, ground it out, and test for those homes and the resistance on each one. So, you have the time to do that, make sure you're testing each individual strip and I strongly suggest when you're probing this that you test each strip twice, meaning that you put it right here at the top, and then you're gonna tap and touch the bottom as well. And that'll give you an accurate reading. So, check for the bearings in here.
So if you're having issues with this, this is one of the culprits. Also make sure your magnets and windings in here are pretty well sound. Right, it's a hot mess the whole thing. And then we're gonna pop this off real quick for you guys too. This is the outside.
And these solenoids are usually the biggest culprit, so. All right. I'm applying with pressure 'cause there's a spring behind this here. So removing the outside for the solenoid, Put that guy down. A lot of times, easier to rebuild kits.
You're gonna be popping that out. This is gonna be part of your rebuild with your spring in here as well. Everything actually looks pretty good in here. I'm looking for is anything to be nicked or rubbed or pushed the wrong way in terms of the magnets on the electrical side. All looks pretty good, so, we're probably gonna be running issues with the armature on this one.
And then after you disassemble and rebuild that, in during rebuild, refer to those owner manuals and same thing with the manufacturer instructions they do a really good job of giving you a play by play action with what you need to do. So check that out and, and go through that correctly. But also as you're going through make sure everything's freely moving that you need to move. So, you know, after installing this, make sure the spring is activating correctly, you know, being pushed down and also checking out your starter Bendix and the gears and everything, bearings when you're getting down the road. So, save your time and having to disassemble and reassemble once again, terminals, make sure those are nice and tight, and that also that the covers and gaskets are on there as well.
It's a world of pain having an a lick of water getting inside of here and destroying half this starter, so, make sure those gaskets are in there as well. We've got three minutes, I just wanna broadly cover brakes for you guys, we're not gonna get to ignition coils but, obviously, with our braking systems real quick we have various types of them, disc and drum a lot of them, not a lot nowadays, you were, we're looking at calibers and discs are in rotors for our setup. So a couple of key parts of these, of your braking system, obviously we have our pads which we wanna check within our caliber here for any disc, just any wear and tear that may have gone through or any disforming areas. But what you see inside here are the pucks. This is a six puck, what we were refer to a lot of bikes now street glides.
Road glides have four pucks, and these pucks are the amount of pressure that we're gonna be applying, so some of the higher performance bikes we're gonna have or even if we're running a single braking system in the rear we're gonna do a higher puck in here to ensure that we're having better braking power and performance. So if you're having issues and you're seeing your pads being worn down differently, even if your rotor is also discolored and deformed, you're gonna wanna take a look at these pucks and making sure that all the fluid is properly pushing through and the gaskets are properly seated, the O-rings in there. You won't have to look too much at the pins and the keeper up here and it's gonna be down here in the mechanical side, so this is something that happens a lot and people overlook. They go directly to the pads and the keepers and make sure those are properly seated. It's nine times out of 10 these pucks that are not working properly, so even four puck applications, make sure you're checking these.
Additionally a big culprit of that, of pads wearing down longer or quicker than normal is your rotor, so a couple of things I strongly advise you guys to check is that making sure that those bolts that are to the hub of your bike, those are properly seated and torqued down appropriately, and it's seated correctly, 'cause even the most, even the slightest little tweak will actually push that off, and it just wear that sucker down quickly and give you a world of hurt. So check to make sure those are seated, and then time after time if you have miles on your bike, you just bought a new bike to rip around on, checkout and make sure that disc is actually true. Easiest way is taking, if you have it off your bike, put it on a flat countertop, something that you know is surely level and then slide feeler gauges around it and double check to make sure that's flat. If those two aren't the issue, then you're looking at your caliber. So a lot of times those are overlooked, and, additionally, with that, with braking systems, you're having, we've got a lot of people that talk about spongy brakes and that's where you still have air in there.
And people do write on that, that eventually it's not gonna work because that's gonna give away. So, spongy brakes, quote-unquote, take a look at on your bike and, you know, test your lever, test your gap, free play and stuff and make sure you're, you're avoiding that. If you do take that extra time and bleed it out, I know bleeding brakes is not fun at all. But it will save you down the road, so, make sure you check that out. Any other questions you guys have, make sure you email us, drop it in that box, hit that share, our #sharefixmyhog on Instagram and show us your bikes and what you're riding around on and where you're going and download that free video for you guys, can't be free.
So thanks again for tuning in this this month we'll be back next month and should have some ideas for topics if you need it too. So thanks again, guys, and enjoy the week.
I have a 78 Harley Cafe Racer. Which S&S would you recommend should I decide to replace by Keihin. Do you recommend HD Syn3, Amzoil, or another oil for engine....then same oil for transmission or gear oil ? Thanks for the awesome information.. Chris
What’s your goto parts cleaner for carbs and what do you recommend for removing stuck gaskets or gasket residue.
Can you tell me on this list of free error codes what part of the list pertains to my 2010 Ultra classic with out ABS?
Whats a good first Harley (used) for a novice?