Cam Chain to Cam Gear Conversion Introduction and Tools
Mike Roen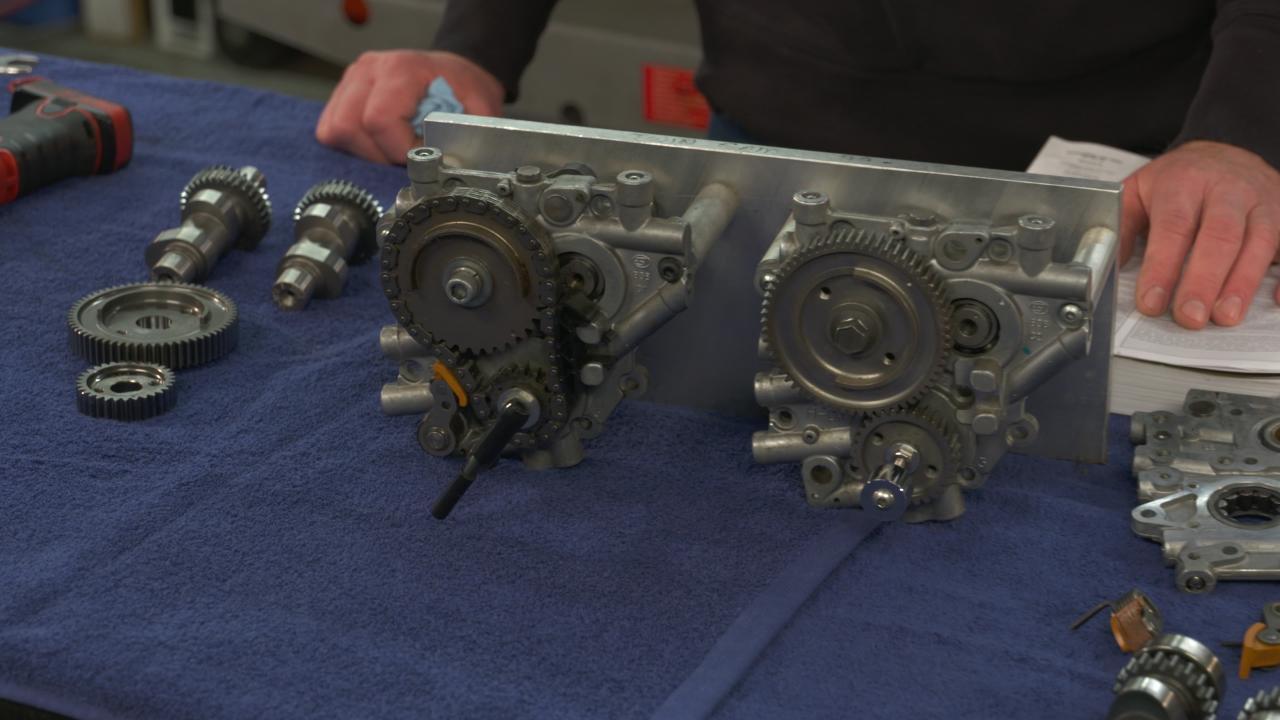
Video Player is loading.
Mike gives us an overview of what goes into a Twin Cam compartment inspection and upgrade of the tensioner chain.
From 2000 to 2006, Harley-Davidson’s spring loaded cam chain tensioners were a complete disappointment to say the least! Eventually, Harley began suggesting that the tensioners be inspected at 30k miles. Hardly helpful. In the real world, independent shops (like us) have seen spring cam chain tensioners fail with as little as 15k miles. On the other hand, we have had customers go upwards of 60k miles without failure. We guess that’s where HD arrived at suggesting inspection at 30k. We also suggest you watch the Cam Chain hydraulic Tensioner Upgrade Project Videos Here.
Regardless of which style upgrade or vendor is being considered, there are a few things that are extremely important to take into consideration. Inner cam bearings must be upgraded to Torrington bearings. It is imperative that the bearings are replaced correctly and with the correct specialty tool. If inner cam bearings are damaged during removal or installation, debris can fall into the crankcase. This will inevitably result in pulling the motor out of the frame so that the crankcase can be separated. This, in order to retrieve the debris and properly clean the compartment.
Whether or not you will be using adjustable pushrods, if rocker boxes are leaking, we strongly suggest addressing at this time. If adjustable pushrods are not needed for a conversion, stock Harley-Davidson pushrods are good quality and fine to reuse. It’s important that the hydraulic tappets are replaced. Tappet failure can be catastrophic to a motor. Like a bad cam bearing or a broken spring tensioner, debris from a broken hydraulic tappet can spread throughout a motor. It can score or completely seize an oil pump. If oil pressure is lost, you have catastrophic damage will be inevitable.
If considering a gear drive conversion, pinion shaft run-out will need to be measured. If run-out exceeds the manufacturer’s specified limit, flywheels will need to be replaced or re-trued, or a different conversion will need to be installed.
Hey everybody, it's Mike Roen with Fix My Hog. In this video today, we're gonna be installing the S&S gear drive cam kit. Now, this kit is nothing new. Back in 1999 when Harley came out with the twin cam, pretty good engine and right away S&S kinda looked at it and looked at this tensioner arrangement and said, you know what, that's gotta go. And so they built this gear drive cam kit and we've been putting them in ever since 1999.
Now, what we're seeing is kind of a resurge of all these people are going out and are looking around at older Harleys and they're going, "Wow, I can afford a Harley now." So they're buying a '99 to '06 twin cam and what they're not realizing is, you know, you got these tensioners here, you got the one on the inside and one on the outside and what Harley's recommending is an inspection at 30,000. And a lot of people are oblivious to this and they buy the motorcycle and they give me a call and I, you know, the first question out my mouth is, "Have you had the tensioners inspected?" And they're like, "What tensioners?" Well, then it opens up this whole conversation on you got to pull the cam cover, you got to take a peek at it and see what they look like. And then it kinda leads into, you know, the best option to make it bulletproof and never go back in is gear drive. We see a lot of problems with the hard facing come off the factory cam, the inner cam bearing, you know. There's just a lot of upgrades we do when we do this kit.
We're gonna go over this today in this video and it's gonna be, you know, a lot more detail from what I've seen on the internet. So, if you're new to the Harley game, this is the first thing you're gonna want to look at on your twin cam. So, we're gonna take a little bit of time here and kinda go over the components we're gonna be putting in your engine today. Okay, so you went out and bought yourself a older twin cam from from 1999 to 2006. They have the spring-loaded tensioners in '06.
The Dynas actually were kinda the guinea pig that year and they went to a hydraulic-type tensioner. And, you know what, Fix My Hog, we already did a video on the S&S hydraulic cam kit. You know, that's an option. Typically, you know, we're doing that when the crank run-out is too much and then that's a really good option. But for all longevity, bulletproof purposes, the gear drive is really the way to go and that's what we're gonna concentrate on today.
Now, if you look at the cam chain tensioners, people get their motorcycle home, they pull the exhaust, they pull the cam cover, and they want to take a peek in there 'cause you can kinda get a pretty good shot at what they look like. And I'll show you a couple here. Now, you can see this one's severely worn out. It's on the verge of, you know, major catastrophic damage to the motor. It's gonna run all it's debris through the oil pump, through the cam plate, through the lower rods.
And I have seen them failing before 30,000. I've seen guys ride it up to 60,000 without a problem. So, it's just something you're really gonna want to keep an eye on. Here's a shoe, you know, what they should look like. There's some aftermarket companies that make a rebuild kit for the OEM tensioner.
You know, if you want to save money, you put it back to stock. But, you know, the problem with just doing inspection, say you pull the cam cover, everything looks wonderful. Well, here's what you don't see and it's a problem with the, you know, the hardness of the factory cam. If you look at this real close, you can see the hard face is coming off. And eventually, what that's gonna do, it's gonna create a couple of problems, big ones.
Now, this one's even more catastrophic 'cause where the hard face came off is actually where the inner cam bearing rides and then you're talking, you're gonna wipe out the crankcase half. It gets very expensive to replace that or have it, send it out, and have it fixed. So, you know, if you think you're off the hook when you pull the cam cover and the shoes look good, you're really, if you're gonna keep this motorcycle and you want to take the time, pull the cams out and do a thorough inspection. Replace the factory lifters, replace the inner cam bearing. There again, let's go over that right now while we're talking about it.
Here's the factory cam bearing. It's kind of a cage bearing and what we see is these can deteriorate around 50,000 miles. Now, what S&S does, they say this Torrington bearing, there's no cage in it and the longevity is, like I said, we've been putting these gear drives in for the last 16, 17 years. I got customers with over 100,000 miles on their bike. Never a problem with the inner cam bearing.
Never a problem with the hard face coming off the cam. You know, that's a huge plus right there because, like I said, people think they're off the hook but boy, these cams are soft. You know, the hard face wears out. So, that and it's a very anemic cam. You know, it's EPA-compliant and we really just don't put a stock cam back in.
Most of the bikes, we're looking for torque and with it comes horsepower. So, it's really good upgrade. So, what we'll end up doing, you know, the number one thing you do when you get the cams out is you check the run-out on the crank. 'Cause, you know, they're saying 3,000. Some people push it on that as far as the run-out.
If it is excessive like any 2007 and later, when they went to the hydraulic cam chain setup, the crank run-out got extremely bad. You know, they opened up the tolerance on that so we really have a hard time putting gear drive in the '07 and later unless the crankshaft is, you know, updated to the S&S flywheels or you take the factory crank, send it out, and have it chewed and pro plugged, and then you can get away with it. But we're gonna cover that a little later on the video when we get the cams out of this motorcycle, so. There again, let's go over the lifters while we're at it 'cause that's another big thing. You know, in the brochure here for the cams, they're saying you can keep the lifters in the bike and do the cam swap, which is true.
But here's the deal, the factory lifter from about 2010 and later, the quality of the lifters has just kinda gone downhill. And if you read in factory manuals now, what they say is a frosting is normal. Now, if you look at this lifter, you can probably zoom in on that, you can see the transition of where the hard facing is coming off the thing. And that's a lifter with less than 20,000 miles. Now, frosting to me is saying that the hard facing is deteriorating.
So, anytime you're in there, buy yourself some quality S&S lifters. You don't want to have this problem. I mean it's basically free labor for another 150 or 60 bucks. Buy four new lifters, put 'em in. I got another example here of a Harley lifter that what you can do is you kinda clean all the oil out of it.
And then you can see that the hard face there is coming off of it and put a magnet on, you can see that the bearings are deteriorated and that's gonna get run-out all through your motor. You want to avoid having to split the cases and replace the flywheels, you know. So, you want to catch all this stuff before it really deteriorates. Here's another example of a Harley lifter that's completely deteriorated. So, that's not a corner you want to cut.
I mean, we're gonna pull the lifters out of this bike today and replace all four. It says in the brochure you don't have to. I mean, but we're gonna cover that base 'cause we don't want a problem. So, as far as that goes, we're gonna be putting adjustable pushrods in this motorcycle. You don't have to do that.
In fact, first thing you're gonna want to do before you do cut the pushrods if you are putting them in. So, you gotta take and do an inspection on the lower rocker box gaskets and the upper rocker box gaskets. 'Cause if there's any leaks, then you gotta have the rocker boxes off anyway. You might as well, you know, just reuse the factory pushrod unless you're putting in more than a drop-in cam. The cams we're gonna be putting in today are 510 lift.
That'll will work fine with stock pushrods. It'll work fine with stock lifters. It's, you know, a drop-in cam. It's relatively safe. And most of my customers, that's what they want.
You know, they want pump gas, electric start. They want to ride this thing forever and that's the nice thing about this cam. You know, it's gonna give you good torque, good power, and good reliability. So, let's move on. Okay, let's go over the parts included in the kit from S&S here now.
What you're gonna get is you're gonna get the full bearing kit which is really nice because it's got the two Torrington bearings, you know, that we talked about. The inner cam bearings which if you're in there, you gotta put them in. You know, it's kind of a big deal and we're gonna go over that tool here in a bit to use there. So, inner cam bearings, you actually take and you get rid of the side load bearing in the cam plate here which for the chain drive. In fact, in '99 and early 2000's, they had two ball bearings in here.
And they realized right away that the ball bearing on this cam, on the rear cam, couldn't handle the load and so they started failing. So, Harley actually had a bulletin and a warranty thing. Five years and 50,000 miles, they would warranty it. And then they went to the side load bearing right in to 2000. So, we actually go back to a ball bearing here because with the gear drive, it doesn't have that load being exerted on it, you know, from the chains.
So, we're gonna go over that. So, it comes with two ball bearings for the cam plate. And then, of course, you got gear drive cams. The nice thing about this is when you buy the kit from S&S is these gears are already pressed onto the cam so you don't got to mess around with that. 'Cause that's kind of a big deal, putting them on correctly.
That's done. You're outer gear set. Like I said, it's pretty nice setup. Put it on, forget about it. Just to let you know, okay, so you check the run-out on your crank and we're gonna show a procedure on checking the backlash.
You know, nobody checks this but we're gonna cover that base today because it's kind of a big deal. What they offer is a couple different gear sizes, plus and minus, so you can actually fine tune that if you really want to chase that. And the only time you're really probably gonna do that is if it was tight, you know. And we're gonna be measuring that here later on the video. Another thing they do that's kinda nice is this little cam plate here.
It's a support plate. It's a lot thicker than the factory one. You can see, I got a stock one here. Just take a look at the difference there. It's a lot beefier.
I mean, if you were putting some wicked cams in here, you want to increase some more support to the plate. But even with this drop-in cam, it's a nice little upgrade. So, that's something that comes in the kit. We'll be putting that in. And it's got a new circlip here, of course, for the cams.
Some new hardware, O rings, and of course, a cam cover gasket. So, pretty complete. We're gonna be obviously replacing the lifters like I said earlier. So, that's something else you're gonna want to order up, have them ready to go. Good quality lifter.
And in this video, we're actually gonna put in the S&S Quickee pushrods. And what I like about these pushrods is you don't have to remove the lifter blocks if you don't want to. I mean, as far as installing 'em, a lot of vendors, it becomes more labor intensive. And these are actually really easy to put in and it's something we wanted to cover on the video because there isn't much out there on these. So, we'll be going over that.
And then showing, there is actually a procedure. Were gonna show the gear lash on the inner cam bearing if you really wanted to chase it. So, let's go over some of the tools we got here because like anything, this is a pretty big job and you're gonna need some special tools. Probably the most important one is gonna be the inner cam bearing and it's, this is the part you can't shortcut. I mean, you know, you gotta put the inner cam bearings in it and if you don't want to rush out and buy this tool, 'cause it's expensive.
It's got the remover for like a blind hole and then it's got the installer and this plate. You're probably only gonna use it once, you know, unless you get a group of guys together, maybe all pitch in. But if you don't have that, here's what I would do. I would probably strip the motorcycle down, get the cams out of it and call up a local independent shop or the Harley dealer and say, "Look. Here's where I'm at.
"I've got two Torrington cam bearings, "I'm gonna trailer my bike up "and leave it with you a day or two, "charge me whatever." I mean, I would think the bill is not gonna be over an hour. That's cheaper than the tool. They're running the risk of putting the bearing in. You know, if you're not comfortable with it, you'd be probably better off just have 'em do it. But if you've got the money and you want to do it, buy the tool.
You know, there's probably cheaper ones out there but we use that thing quite a bit. Another thing they got here is a little support plate tool. And how this works is you can put the cam plate on here just so you can press the cams and bearings in and out of it. It's got another little thing for, you know, pushing the bearings in. It's kinda nice.
I've seen guys on the internet, they're putting holes on table where they're building 'em out of wood, block wood. You could probably take your time and do that. There again, like I said, you're not gonna be doing this every week. So, if you had to build the tool, take your time, do it. You know, if you got buddies that are doing the same thing, everybody get together and put their money together.
This, you really wouldn't need to buy this but it's part of that kit for pressing the cams in. You can kinda improvise on stuff like that, not a big deal. This tool here is to, you know, unload the tensioner. It just goes on there like this and then you can unload it. If you're putting the gear drive cam kit in, doesn't really matter if you damage these things.
Just take a channel lock, bend them back, and put the pin in. We're gonna kinda cover that, how that comes out of there. There's a little retainment thing that goes in there to hold it back. But if you're putting gear drive in, this stuff's basically going in the trash anyways so it's not gonna matter how you take it out. So, all right, we're gonna get ready to cut the pushrods on this motorcycle.
Very professional.